How to create recurring events, classes or booking system with time-slots, using My City Tickets
Recurring events with time-slots, which may recur several times a day, are very common type of events and are vastly used for any event, class, booking, renting or registration that is time-based.
Some common use-cases are:
- Admission to a museum, amusement park, or a show
- Reserving time for an attraction or activity
- Registration for a class or training such as sport, yoga, arts, dance, music, etc
- Holiday shows
- Movie theaters and cinemas
- Transportation (buses, ferries, …)
- Tour reservation
- Drive through events and shows like holiday lightshows
- Reserving time to use a room or equipment like booking a conference room, a VR experience or a Jet ski
- ...
However, most ticketing systems miss this functionality and the event organizers usually end up using work-arounds that are often not optimal or confusing. Some common issues when using such work-arounds to create timed-events are:
- Event showing the wrong date or time during the purchase or on the ticket which causes confusion to the buyer
- Hard to manage all instances of the event or individual instances
- Hard to pull reports or perform ticket validation
- Hard or impossible for the buyer to change their date or time without contacting the box-office staff
My City Tickets, however, has full support for recurring time-based events, classes, booking or registration with or without multiple time-slots per day.
What is My City Tickets?
My City Tickets, is a white-label, fully branded box-office and ticketing / booking system that allows you to have your own full-featured registration and ticketing system with full control over everything including buyer fees, pricing, returns, terms and policies.
You can use it for online sales, ticket booth or retail location, as well as over-the-phone sales.
Ticketor can be used for any type of event or activity that requires ticketing, admission, registration or booking such as:
- Events
- Classes
- Admission to a museum, amusement park or attraction
- Tour reservation
- Transportation
- Booking a service, room or equipment
- ...
My City Tickets comes at very reasonable and unbeatable price that is transferable to the buyer, and it comes with great customer support, documentation, walk-through and tutorial videos.
My City Tickets is known to be the most feature-full, flexible and automated registration and ticketing system that meets the requirements for any ticketing or registration scenario.
It also allows you to collect the sales money directly using your own payment processor or PayPal account so that you receive the sales money directly and as tickets sell.
Your My City Tickets website is fully mobile friendly and search engine optimized. Your website and events are submitted to Google and other search engines to make sure you get the highest visibility on the web.
You can read more about the My City Tickets features at www.mycitytickets.com
Sign up for My City Tickets
If you already have a My City Tickets account, then sign in to your account by browsing to your My City Tickets link. Otherwise Sign up on Mycitytickets.com. It takes less than a minute and requires no credit card.
Fill out your basic information on the sign up form, choose an address for your My City Tickets portal and click on the button.
Choose any plan at this point as all the plans support all the ticketing features you may need. Moreover you can always change your plan at a later time.
Click on the sign up button to see the confirmation page.
Your ticketing and reservation system is ready and you can navigate there using the link on the confirmation page to configure it, customize it and create your events, store, gift cards, etc.
When you first land on your website, or a new page of your website, a walk-through pops up. Go through the steps to learn about your My City Tickets site or the page you are on. It takes just a couple minutes and it is the fastest way to make yourself familiar with the site or that feature. It will save you lots of time down the road.
Create an event
Creating an event on My City Tickets is quick and easy. Let’s quickly create an event.
Please note that although we use the term “event” in this, the concept can equally apply to any activity that may require ticketing, admission, booking or reservation.
I can create the event from the quick links section, or from the “Control Panel”, “Events” button.
It pops up an “Event creation wizard” that I can use to create my events basics before going to the actual event editor that offers plenty of options and customizations.
Alternatively, I can close the pop up and use the event editor.
- Set the event title.
- Select the event type.
The event can be “Online” or “In-person” . Online events can be “Live” or “On-demand”. You can use on-demand events to easily monetize your videos.
In-person events can be “assigned seated” or “General admission” or a combination of both. “Assigned seated” events allow the buyers to pick their seat on an interactive seating chart. My City Tickets offers a state-of-the-art seating chart designer tool that allows you to build any seating chart including, theater style, round-table dinner style, restaurant or cabaret style, night-club style or any combination of them quickly and easily at no charge.
- Select or create a venue. Venue is the physical or virtual place where your event happens. For seated events, the venue also contains the seating chart.
- Select the date and time of the event. If the event is recurring, you can set the date and time to the first recurrence and later-on set the schedule.
- Optionally upload an image or flyer for the event
- Set the tax or vat and social distancing setting
-
Set the prices and pricing structure.
My City Tickets price levels and variations, gives you full flexibility to create all kind of pricing. If the event is assigned seated, it also lets you set multiple prices per seat such as kids price vs adult price.
You can add as many “price levels” and each “price level” can have as many “price variations”.
Some example of price levels and variations are:
- General Price
- VIP
- Kids
- Seniors
- Members
- Time-based pricing such as
- Group based pricing such as
- Couples ticket
- Family ticket
- Group of 10 or more
- 2-day ticket
- Weekend pass
- Multi-session or multi-day tickets
Price levels and variations can have their own face price as well as the fee or the service charge that the buyer pays to you as you are the one who sets and collects the service charges and you can charge as high or as low as you like.
They can also be “Password protected” and hidden from general public.
Note that, you can change the pricing and the capacity at any time and the changes will be effective immediately.
-
Add a payment processor or my PayPal
Payment processor is a financial service that allows you to charge credit and debit cards and deposits the money in your bank account. Most payment processors, except for PayPal, are behind the scene and the user doesn’t know about their name or brand.
We support most common payment processors including Stripe, Square, PayPal, Braintree, Authorize.net, …. If you don’t have one, you can simply get a Stripe or PayPal account in a couple minutes and use it right-away.
Click on Stripe or PayPal button, sign in to your account or fill out the sign up form to get a new account, and click on the button to add that to your account.
- Finish the event creation wizard and it will take you to advanced event configuration.
There are lots of settings and configurations that allows you to customize the event.
Complete the event by adding the event description, fine-tune the settings, add your flyer and video.
You can also:
- Set the event’s sales start and end date and time
- Specify what delivery methods are available for the event
- Set your return or exchange/upgrade policy so buyers can upgrade their tickets or change the date without contacting you
- Set the event categories, type and genre
- Set the event availability, restrictions or make it available to certain group or protect it with individual passwords
- Add questions for the buyer to answer
- Add related events, merchandise, gift cards or donations to the pre-checkout page to up-sell and promote them
- And finally test the event as an event buyer by going to the “purchase ticket” page and make sure everything works as expected.
Make the event recurring and set the schedule and time-slots
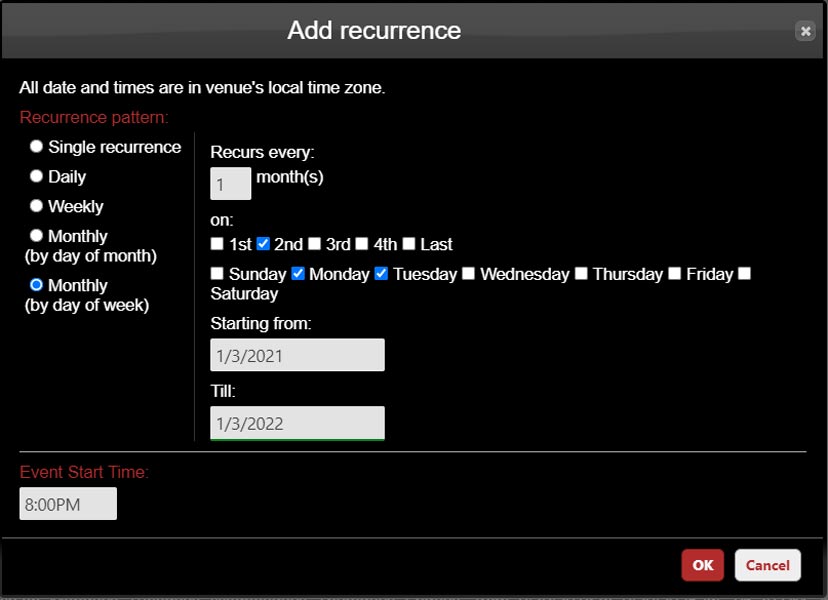
On the main tab, click to make the evet recurring. It opens the flexible scheduler that allows you to schedule the event as you wish.
You can click on “Add recurrence” and add as many recurrences.
You can add recurrences such as:
- Single recurrence (at a specific date and time)
- Daily recurrence
- Weekly recurrence
- Monthly by day of month such as 5th and 10th of the month
- Monthly by day of the week such as 2nd Monday of every month
If you have multiple time-slots per day, you should add one recurrence per time-slot
You can also exclude some days or time slots to accommodate for holidays. Just click on “Add exception” and add your exceptions.
Note that you can always come back and add more recurrences, extend the date-range or exclude some dates but you better exclude the dates before tickets are sold for that date.
Note: If you are a new customer, you may need a one-time review and approval to make the event recurring. The process is in place to make sure you have created your event correctly before creating tens or hundreds of instances of the event. Approval is done very quickly and you can always chat with the support to expedite the approval.
Feel free to chat with your dedicated support engineer and ask them to review your event. Ask questions, as many as you have. Make sure your event and process are all set correctly before going live.
Your Event IS LIVE and ready to sell!
Your event is all set, live and ready to sell.
Before promoting the event, from the “Actions” menu, go to the “Buy tickets page” and experience the site as a buyer. The link will take you to a page with the event information, address, description, flyer and a calendar.
Pick a date/time-slot and you will see the available tickets for that date.
Add tickets to your cart.
You can add tickets to as many events or dates. You can even add merchandise, gift cards, donation, or services to your cart and check them out all in one transaction.
When you are comfortable that the event is ready, go to promote tab of the event creation page, get the link to your home page (where all your events are listed) or the direct link to the event and share it on social media, newsletter or other ads. Add the link to your website or embed the ticketing into your website or WordPress.
for more information and detailed instruction, check out Create recurring events and event replication instruction.
POS (Point of sales) - Sell tickets in-person or over the phone

Make yourself familiar with the POS page that is available from “Control Panel > Box Office > POS”
The Point Of Sale, is a touch-friendly, very fast, single page application that allows you and your sales staff to sell tickets or reservations face-to-face or over the phone, in as many ticket booths or retail locations.
You can accept credit card, cash, check or you can send invoices. You can apply promotion code, season tickets or gift cards. Based on your permission level, you can add additional fees or give ad-hoc or direct discount. This feature allows you to easily give away complimentary or discounted tickets.
You can use the POS on any tablet, computer or mobile device.
In terms of equipment for your retail location, My City Tickets POS is very flexible. You can use no equipment at all, or use regular office printers or professional thermal ticket or receipt printers and credit card readers.
The POS allows you to sell anonymously or you can look up or create registered users. If an email address is provided during the sale, the buyer receives the tickets on their phone which eliminates the need for a printer and paper tickets.
Gate Control & Admission - Barcode Scanning
You can use your phone or any device with a browser and camera to scan the tickets. Make yourself familiar with the gate control app. You can use the Android or IOS app or you can use the browser app that is available from the Control Panel. You can admit buyers by scanning the barcode or the QR-code on their ticket or look them up by name, email, phone number or confirmation number.
Gate control also supports ‘Exit and Re-entry’ so you don’t need to stamp attendees.
