IDTitleDateBy 
3126

5 reasons to choose My City Tickets as a free alternative to Eventbrite

10/1/2023 Admin


You may or may not have heard that Eventbrite is shaking up its pricing plans – with one of the main changes coming in the form of a new ‘Organiser Fee’. This means that anyone selling tickets to an event with more than 25 attendees on Eventbrite will need to pay a fee just for listing the event – regardless of whether it's free to attend or not. It’s important to note that the Organiser Fee needs to be paid on top of all the other usual Eventbrite fees, and how big it is depends on the size of the event. In a nutshell, Eventbrite is no longer going to be free to use for most free events.

There is the option to choose Eventbrite’s subscription model instead, which means you’d no longer need to pay this Organiser Fee. But, as you know with subscriptions, this ties you in to using their service which can feel like a pretty big commitment, as you have to pay the monthly subscription fee even when you aren't running events! 


All these changes might have you wondering if there’s a better, more affordable way to ticket your own events. Especially if you run them with free entry, and can’t afford for an Organiser Fee or monthly subscription to eat into your costs. 


Keep reading to learn a bit about My City Tickets, how we’re different to Eventbrite, and why we could well be the perfect ticketing alternative for your free events (and paid events, for that matter).


  1. A fair, simple pricing structure – genuinely free for free events

    This is a big one! Our pricing structure is very simple, transparent and fair. If you run free events – you will literally never have to pay us a penny. It’s totally free to create a My City Tickets account, and free to list your events. We only charge a fee per ticket sale for paid-for events. 

    There are absolutely zero hidden fees to be aware of here, either. Our pricing is this simple:

    Free events: Free (really, truly, free. It’ll cost you zero pennies, cents or any other currency to list and set up event registration for your free events).


    We believe this pricing structure makes us one of the fairest, most affordable ticketing sites out there. Woohoo! 🎉

    Check out our pricing page here >

  2. Total flexibility – no tie-ins, no contracts

    There’s no such thing as a My City Tickets contract or subscription. You can play around with our platform as much as you like without having to commit to anything. It’s free to get set up, and free to start listing, meaning you can give us a go without risking any of your hard-earned cash. 

    Once you get going – you can continue to enjoy full flexibility for both free and paid events. Our pricing options mean you only ever pay for exactly what you need. Nice. 

  3. Your data, never ours – end of story

    Unlike Eventbrite, we don’t hold onto your data or use it for our own marketing purposes. In fact, your data remains just that – yours. We like to think the info you gather about your customers is yours to do with as you like, and that it really has nothing to do with us. Call us old fashioned.

  4. Genuine, round-the-clock support & a community vibe 

    If you need help with any aspect of using our platform, we’ll be there to chat to 24 hours a day (as in… the real, human us, not chat-bot versions of us). We aim to get back to all queries within five minutes (and are often quicker), no matter how big or small your event is, or what your issue is. We also run regular webinars to help our users get the absolute most out of our platform, and make a point of genuinely listening to the feedback and suggestions we get. We’ve already implemented lots of features based off what our users have told us would be useful – and we’re always open to new ideas! Basically, we’re all one big happy community.

That’s a wrap! We hope this article has been insightful for you – it would be great to see you on the platform soon! In the meantime, if you need any help setting up an event or have any questions at all, just pop us a message on our website chat and we'll get back to you in minutes.


3125

My City Tickets vs. Eventbrite

10/1/2023 Admin


My City Tickets vs. Eventbrite


My City Tickets and Eventbrite are both great ticketing and box-office systems and are used for event ticketing. Event organizer are often confused which one to choose and often make uninformed decisions that may significantly affect the success and outcome of their event and their revenue. A decision that may cost or affect their bottom-line revenue by over 30%!

This article is written in response to many event organizers who frequently reach out to us and ask us to compare My City Tickets with Eventbrite. In this article, we try to shed some light on the differences and to answer questions like:


Why Eventbrite is more popular and well-known?

    • How much Eventbrite is more expensive and why? And if it is justifiable?
    • Which one has features that I need?
    • Which one helps me sell more tickets?
    • Does the Eventbrite’s marketing platform help me sell more tickets?

However, we do not like to single out a specific provider in this article and so we are going to write this article in a general manner to compare public ticketing systems ad marketplaces like Eventbrite or Ticketmaster and a private ticketing platform like My City Tickets. As a result, some points mentioned in this article may or may not apply to Eventbrite or a specific ticketing provider, but it will be informative enough that the reader can get the answer to their questions and make an informative decision. Only for comparing the cost, as both My City Tickets and Eventbrite publish their prices publicly online, we are actually going to do the math to show the differences in cost between the 2 platforms.

For full transparency, this article is written by a My City Tickets affiliate, however, we try to be very fair and accurate to the best of our knowledge at the time of writing this article. We point out the differences and the pros and cons in a way that is totally verifiable and make sense. Please feel free to verify the provided information or reach out if any correction is needed.


Main Difference (Public vs Private)

Ticketing systems can be divided in 2 categories, Public and Private.

A public ticketing system is a shared website, that different event organizers sign up on, create events and sell tickets on that website, along with all their competitors. The system may allow the event organizer to embed a widget of their ticketing platform on the event organizer's website to initiate or maybe to complete the ticket purchase on that site. However, the buyer buys their ticket from the ticketing system and not directly from the event organizer. The ticketing system often shows the competitors' events on the same page or other pages and often sends marketing emails with competitors' events to the buyers. Eventbrite is a sample of what we call a public ticketing system.

In contrast, My City Tickets is not a website but a platform. Event organizers sign up on My City Tickets, get a fully branded private ticketing website for themselves and sell tickets on their privately owned, branded website that may be on their own domain and not My City Tickets. Event organizers sell tickets directly to the buyers and have full control over every aspect of their ticketing and practice as the system is owned by themselves.

In other words, using My City Tickets is like having your own, private ticketing site, with all the features of a public ticketing system, for your organization and only your events and merchandise are going to be available on that site and ticket buyers buy tickets directly from you.

This is a huge difference that is the root of all the other differences mentioned below.


Who Owns The User Data and Can Contact Them 

As you can expect, with any public ticketing system, the buyers sign up on the ticketing system, not your website, and becomes the ticketing websites users, and most likely will choose to receive emails, marketing and notifications from them. The buyers have to agree to their terms and policies. All the data including user’s email, phone number, and address are usable by the ticketing system and the ticketing system will promote and send emails and communication to the buyer (your buyer) about similar events from your competitors in your area. A public ticketing system can also potentially sell your buyer’s data or share with other companies and your competitors.

With My City Tickets, however, all the buyer’s data exclusively belong to you. My City Tickets never uses your buyer’s email address or data, never contacts your buyers, never sends competitors’ events or similar events to your buyers and will never sell those information.  

In short, a public ticketing system owns or co-owns your buyer information and will send them competitors' events. With My City Tickets, the buyers' data belongs to you and My City Tickets never contacts your buyers.


Cost

Unlike, a lot of ticketing systems that do not post their prices online and require quotes, both My City Tickets and Eventbrite have their prices publicly published, however, we found the way Eventbrite publishes their price very sneaky and tricky.

Since the prices are publicly published, we can actually compare the 2 companies pricing.

As of this article in Aug. 2023:

  • My City Tickets fee, that is clearly posted on MyCityTickets.com, shows the most popular plan as:

My City Tickets Basic plan charges only 2.5% + $0.50 per sold ticket. This is the unlimited plan, which includes all Ticketor features, unlimited events, tickets, venues, seating charts, merchandise, and pages.


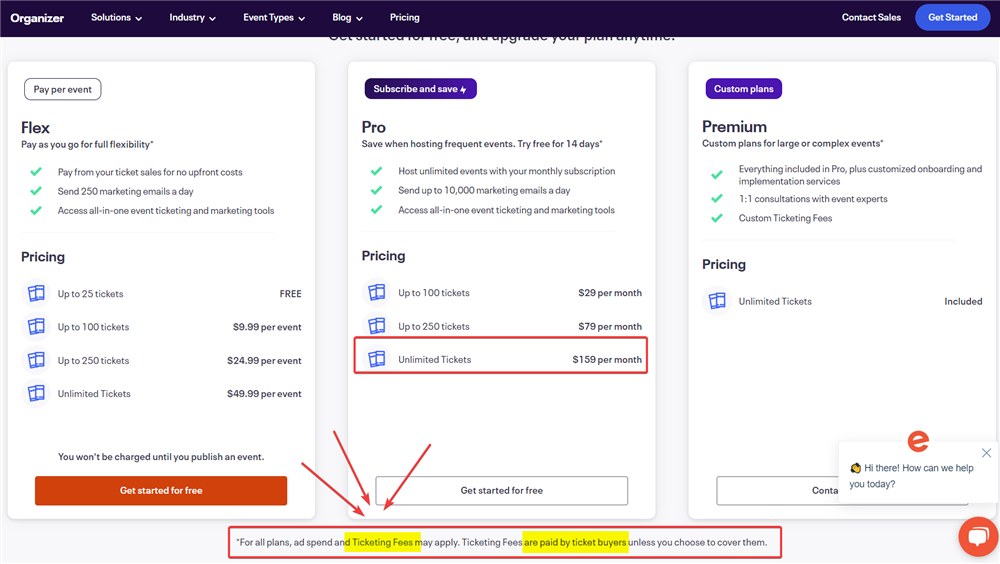
At first glance we were confused by the pricing and thought that you can sell unlimited number of tickets for a flat monthly fee of $159.00, which sounded too good to be true.

But after looking carefully, we noticed that there is a small sneaky note at the bottom of the chart about another "ticketing fee", which happens to be the major fee. By default, Eventbrite charges the fee to the ticket buyer, so a naive event organizer may never find out about that fee.

Clicking on the link actually reveals the major fee:

It takes us to https://www.eventbrite.com/help/en-us/articles/755615/[slug]/


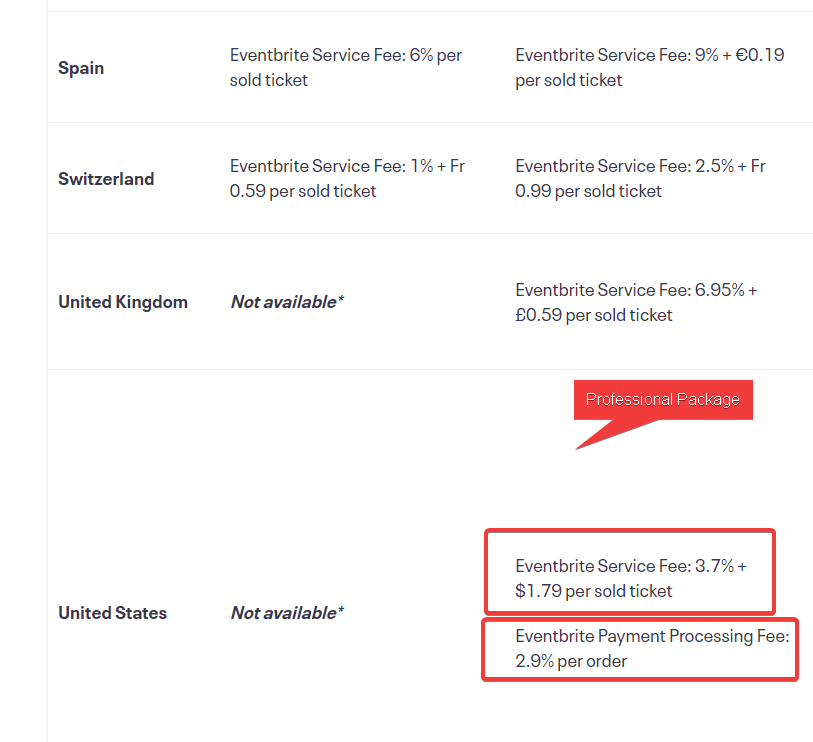
On this page, the ticketing fee for each country is specified. The fee for the United States is 3.7% + $1.79 per sold ticket. To sell unlimited tickets, you need to pay a $159.00 monthly fee as well.

So, let's do the math to get a better understanding of the pricing.

As an example, imagine an event organizer who sell 2000 tickets per month at the price of $10 each.

Doing the math to sell those tickets on Eventbrite, you pay $159 + 2000 * (3.7% * $10.00 + $1.79) = $4,479.00 

In other words, to receive $20,000 in ticket sales, you and your buyer are paying 4,479.00 which is over 22% in fees!

If you sell the same tickets on My City Tickets, using the Basic Plan, it costs 2000 * (2.5% * $10.00 + $0.50) = $1,500 ( $2,979.00 less then Eventbrite)


You are advised to check the fees and pricing for any provider that you are considering as pricing may change or vary.

  • For both systems, the fees do not include the payment processing fee which is usually 2.9%.
  • Both systems allow the fee to be paid by the buyer or can be absorbed by the organizer, however, My City Tickets offers full flexibility as you can set the buyers fee to any amount, to potentially make extra income or to absorb the fee partially, while Eventbrite only offers 2 option to either absorb the full fee or pass it on to the buyer.

The fee difference is HUGE!

On a $10 ticket,

  • My City Tickets charges $0.75 (7.5%)
  • Eventbrite charges $2.16 (21.6%)

There is over 14% difference in the fee. Meaning that if your average ticket price is $10, and you charge the same amount of fee to the buyer, you can increase your annual revenue by 14% just by using My City Tickets. Plus, you will save $126 per month or $1,512 per year on the monthly fee.

So, the cost difference is huge and no-brainer.

But, why? What causes such a huge price difference. If you are curious, read on.


Who do you advertise. Brand vs Branded

 As explained before, My City Tickets is a white-label system. In other words, you sell tickets on your own domain, with your own name, logo and branding. In other words, when you advertise your event, you would say “Buy tickets on MyWebsite.com” not on MyCityTickets.com and you are promoting your own brand.

When buyers go to MyWebsite.com (your site), there is no sign of My City Tickets. It is all about you and your brand. The buyer signs up on your site, agrees to your terms and joins your newsletter. The confirmation email goes out from Sales@MyWebsite.com, your domain, and all the tickets have your logo and name and not My City Tickets. The buyer sees your name on their credit card statement and not My City Tickets.


In contrast, when you sell tickets through a public ticketing system, you advertise: “Buy tickets on The-Public-Ticketing-System.com”. Or if you are more sophisticated and have a website, you may embed the ticketing system's widget and so you may send the buyers to your website, but still the buyers are going to see the ticketing system's logo and branding. They receive welcome and confirmation email from @The-Public-Ticketing-System.com, with their header and logo and tickets are branded with their logo.

In other words, your advertisement money is partially going toward promoting the public ticketing system rather than your own brand.

Thanks to event organizers like you, who have advertised for the public ticketing systems, for many years, those companies have grown to become a well-known and popular brand. To the extent that if you ask a random friend  “Where shall I sell my tickets?”, they would probably name a public ticketing system as they have heard from them so often and might have bought tickets from them. However, your friend might have bought tickets from a site that was powered by My City Tickets, many times, but never heard of My City Tickets name.

As a BRAND, most public ticketing systems are capable of charging much higher fees compared to a ticketing system like My City Tickets, which for over 10 years, has been behind the scene and allowed event organizers to promote and grow their own brand and offered a fully branded solution.  

This is one reason public ticketing systems charge so higher, but there are more to it. So, read on.


Permanent VS Temporary (One-off event)

Both type of platforms are good for a one-off event or random events here and there.

On My City Tickets, you can sell your event, without monthly fee, with no contract, and cancel the account after the event. Or you can keep all your data, newsletter members and your website for free for unlimited amount of time, in-case you have another event in the future.

However, when it comes to regular event organizers, who need a more permanent place or website, a long-term or permanent web presence, with features that require long-term solution or long-term activities, who may have inter-connected events, bundles, packages, season passes, membership, recurring events, renewing memberships, gift cards, store credit (user balances), recurring donations, gift shop (sell merchandise), a bar, restaurant or concession stand, then you most likely need to use My City Tickets and have a full private box-office or e-commerce website.

On My City Tickets, you have your own permanent site that allows you to do long term activities such as:

  • Long-term / permanent web presence with a permanent URL (address)
  • Season passes that allows the pass-holder to redeem a ticket to an event that may be released 6 months from now.
  • Gift cards: You can sell gift cards and the buyer can use the balance for an event far in the future
  • User balances: You can give credit (store credit) to the buyers, or refund a ticket for store credit that can be used for future events.
  • Packages: You can bundle several events together to create a package, optionally at a discounted price
  • Monthly donations
  • A permanent gift shop, bar or restaurant
  • Memberships (annual, monthly), or auto-renewing memberships
  • Giving store credit to buyers who share your link and bring you more sales (share and earn marketing)

These features are most likely not feasible on a public ticketing system that is geared toward individual events.

You cannot sell gift cards or give users store credit on a system that the user is shared with other event organizers and may use the same gift card or account balance to purchase another organizer's tickets. 


Features & Support

Comparing the huge cost difference between My City Tickets and a public ticketing system, you may think that the public ticketing system must have much more features or greater support! But that is absolutely not correct. My City Tickets is actually known as one of the most featureful event ticketing systems and box-offices out there. You can see all My City Tickets features on MyCityTickets.com . Besides the features mentioned in the section above, My City Tickets has advanced features, detailed configuration tools and powerful self-service features that makes it suitable for all your needs and minimizes your customer support effort.

Every word or email on My City Tickets can be customized.

There are long lists of settings for the events and the site that can be adjusted to meet your very specific requirements.   

Powerful marketing tools, advanced seating chart designer, question manager that allows you to collect any information from the buyers or attendees, reputation manager and reviews system, website builder, powerful mailing list system with templating and open/click tracking, integrated donation collection system, integrated store, bar, restaurant, & concession system, unlimited events, white-labeling, are only a small set of features.

When it comes to support, My City Tickets assigns each client a dedicated support engineer, who has been with the company for many years and are well-trained. My City Tickets never sends the clients to a call-center, with level-1 support staff. You will always be able to reach the same dedicated support engineer, who knows you and your challenges personally. Support is available through chat, email, phone call or online meetings.


Marketing and Event Discovery - Marketplace Feature

As a well-known brand, and thanks to the event organizers who advertised for the public ticketing system for free, those public ticketing systems grow to become an event marketplace and an event discovery platform. And so, event organizers may think that if they sell events through those marketplaces, they can make use of the event discovery feature of them and sell more tickets and so, that reduces their marketing cost and so it partially justifies the much higher cost.

In other words, part of the fee you pay to public ticketing system is actually marketing fee.

This assumption may be partially true in some scenarios, but may also work against you.

  • The first question an event organizer must answer is if they make any benefit from the marketplace? If you are selling tickets to a private event or a semi-private event, such as a school event, a church event, an event for a specific community, a community theater, a members-only  event, an event targeting a certain nationality or in a non-English language, or if your target audience are not on marketplace, then you will make no benefit from the marketplace feature, even though you are paying for it on every sold ticket.
  • However, if you are selling tickets to a mainstream event that is open to public, such as a wine festival or a mainstream comedy show, you may be able to sell some tickets or find some new audience through the marketplace.

But there are 2 big catches!


1- You pay the marketing fee twice:

The marketplace is not your only source of marketing. Probably you are advertising your event through many other marketing channels including your social media, your website visitors, your newsletter, your previous and returning patrons, paid Google or social media ads, influencer posts, articles and blog, news release or traditional TV, radio, magazine or newspaper ads.

These marketing activities usually cost you money and it is not fair for you to pay marketing fee to the ticketing platform, for the patrons you acquire through your other marketing activities, or your returning patrons.

So, it makes no sense for your marketing activities to link to and send target audiences to a platform that will charge you again for marketing.


2- You share your buyers and potential buyers' data with competitors:

There is another big issue when you point your marketing links to a public ticketing site, and that is sharing data with your competitor.

Let’s say you are running an ad on Facebook for a comedy show you have this weekend in Los Angeles. A random Facebook user, John, sees your ad, is interested and clicks on the ad to get more information. At this time, you get charged by Facebook for this click. It is called “cost per click”. Let’s say your average cost per click is $5.00.

John lands on the ticketing platform, or your site that embeds the ticketing platform’s widget, to get more information.

  • First problem is that the marketplace may show your competitors' events, or similar events as yours, on the same landing page, or the other pages that John will visit with a title like 'Other events you may be interested in:'. So, the potential buyer who you just spent $5.00 to acquire, is now shared with your competitors!  


  • When John lands on the page, at that point, you as the site owner have no information about John’s identity or contact information, as the ads platform do not share that with you to keep the visitors’ privacy. All you can see, if you are using some analytics tools, is that somebody landed on your page from your Facebook ad, without any details to expose their identity or contact information.

However, if John has ever before signed up or purchased a ticket from that public ticketing platform, the public ticketing platform, using a technology called “tracking cookies”, knows John’s identity, email address, phone number, etc.

* The tracking cookie is the same technology that when you visit a site that sells cars or shoes, tracks you and you keep getting ads for similar car or shoe on other websites.

The public ticketing system makes money from selling as much tickets as possible, and not necessarily your tickets. If they sell ads as well, they make more money from promoting the events that are paying more for ads and not necessarily yours.

So, at this point, the public ticketing system learns that John is interested in attending an event this weekend in Los Angeles, and also, he is interested in comedy events.

Knowing this valuable information, the public ticketing system starts advertising all events, and most importantly all comedy events that are happening this week in Los Angeles to John. John may receive emails, text messages, push notifications or social media and website ads for all your competitors' eventsWhile you spent $5.00 to Facebook to grab John’s attention, now John’s information is indirectly shared with all your competitors for free.


It is like when finding a potential buyer, you call all competitors and share the buyers’ information with them.

It absolutely does not make any sense. This is your most confidential information and should not be shared with competitors.

There is a good chance that a bigger competitor will win John’s business and he is going to buy one of your competitors’ tickets instead of yours.


So, as a general rule, never send your prospects or potential buyers, that you acquire through your marketing and advertising activities, to a platform that:

  1. Charges you again for marketing
  2. Is public and may share the prospect information with your competitors in any way
  3. Will show competitors' events to the potential buyers who are your returning customers or you have acquired through marketing activities

Best of both worlds

So, what is the best solution?

In general, you should always find marketing and advertising platform that best target your specific audience and that may be affected by the age, nationality, culture, language of your audience or type or genre of your event.


  1. If your event does not make any or enough benefit from a marketplace, do not sell tickets on that marketplace and do not waste money, paying for the marketing you don’t use. Use My City Tickets and have your own private ticketing and spend your marketing money where your target audience are.
  2. There are many event marketplaces for different audiences that are not tied to a ticketing system. Consider using them and send the ticket buyers to your private ticketing system that is made on My City Tickets.
  3.  If your event makes reasonable benefit from a certain public ticketing and marketplace and the marketplace can help you find patrons that you could not find otherwise, with a little bit extra effort, you can make more sales and save a lot of money:

Have your private ticketing platform using My City Tickets. Make sure all your marketing and advertising links, including website links, social media links, paid ads links, newsletter links, etc. point to your My City Tickets site which has significantly lower cost and the data is not shared with your competitors.

To make benefit of other ticketing marketplaces marketing feature, create an event on every marketplace that target your audience with limited number of tickets, for the buyers who find you through that marketplace ONLY.


  • If your event is general admission, you can divide your capacity between all the platforms.
  • If your event is assigned seated, you can assign certain sections or rows to each platform.

Ps. You can change the capacity of your event on your My City Tickets site at any time to adjust the capacity according to the sales amount on each platform.


Evaluate the sales you get from each marketplace to determine if the sales are high enough to justify the effort and the extra cost, for the future events.

3121

How to Promote Your Event on Facebook in 2023

8/31/2023 Admin


How to Promote Your Event on Facebook in 2023


Given the wide demographics of its 2.9+ billion users and its status as the largest social media platform out there, Facebook is an incredibly powerful tool for your events! By learning how to promote an event on Facebook, you’ll connect your events with tons of new, interested attendees in no time. Excited to learn more? We’re here to show you the ropes of event promotion on Facebook to help you grow your events.


How to create an event on Facebook

First things first, you’ll need to build your Facebook event! To give you the most time to market your event, you should create this as soon as your event’s main details are solidified (even if your event is more than a year out!). To help you with this, here are some best practices for building a strong event page.

  • Title: Clearly and uniquely state what your event is about in 64 characters or less (ideally under 40 characters for your Facebook ads later).
  • Cover photo: Display an eye-catching image that’ll get viewers to stop scrolling, especially since it’ll be their first impression of your Facebook event. This means use bright colors, add high-quality event photography, and get creative with your graphics!
  • Description: Once you’ve got the essentials covered like the date, time, and location, you’ll want to highlight what your event has to offer, from special guests to fun activities to expected attendance numbers based on previous years. Consider linking off to your event’s website too for more info. 
  • Add tickets: Include a link to your event’s ticketing page to sell your tickets! My City Tickets makes this super easy, helping you set up an irresistible ticketing page in just minutes (we may be a little biased!). 
  • Discussion tab: Use this feed to update your viewers with new information about your guest lineup, exclusive discounts, parking details, etc. Encourage fans to ask their burning questions here, so you can easily respond to them!
  • Co-hosts: Add any partners or featured sponsors as co-hosts to boost your event’s credibility and so they can also invite tons of people to your event too!
  • Category: Under the “Market Your Event” tab, include a relevant tag pertaining to the topic of your event (e.g., Sports, Foods, Comedy) and your location to help improve your event marketing SEO on Facebook, so when people search for events in your area, they’ll find yours first!

Free ways to start promoting your event

Now that you’ve created your event, invite as many people as possible to get the ball rolling! You can invite up to 500 people yourself, and others can also invite 500 people. Be careful to send closer to 100-150 invites out at a given time though (and no more than 200 to be safe) to avoid Facebook accidentally marking your event as spam. You can also personally invite people through Facebook Messenger who follow your page and encourage them to invite their friends!

Encourage your co-hosts and sponsors to share your event with their audiences too, as well as tag them in relevant posts to open up your network and gain more impressions. You can also share your event in relevant Facebook groups so people with related interests can learn more about what you have to offer.

Create and share exciting content on your Facebook page to help build a buzz around your upcoming events. Leading up to event day, share highlights of your guest lineup, behind-the-scenes footage, exclusive discounts, and more to hype up your attendees. You can use your Instagram event content on Facebook as well to get more out of each post! Short-form videos (aka Reels) are especially powerful for expanding your event’s reach to new audiences. And don’t be afraid to repurpose content for your TikTok too!

Looking for even more ways to promote your Facebook event for free? Unlike Instagram, Facebook lets you share links on each of your posts – so take full advantage of it! Make sure your event’s website and ticketing page are easily accessible in your bio and your posts. Plus, share the link to your Facebook event in your newsletter, on your website, across your other social media platforms, and on other channels in your event marketing strategy to cover all your bases!

3124

Gate Control and e-Ticket Validation

9/13/2022 Admin


 Gate Control & e-Ticket Validation


How to admit patrons to your event professionally and in style


Goal:

The purpose of gate control is to validate tickets at the gate and admit valid tickets to your event. It should be fast, professional and able to accurately distinguish valid, invalid and duplicated tickets. The faster the process, the shorter the wait time at the door and the more organized the event.

Traditional methods:

Traditionally, tickets are printed in a print-shop on regular papers. Since most of these tickets lack secure duplicate prevention methods, they are subject to fraud. They can easily be copied and duplicated, using any color printer and copier.

Unlike traditional tickets, e-tickets are more secure and protected by securely generated barcodes that makes duplicating them very hard if not impossible. 

Concept:

To accomplish the ticket validation goals, each e-ticket generated by My City Tickets has a securely generated numeric barcode and QR code. The numeric value for the barcode is also printed right beneath the barcode. 

In simple terms, the gate keeper is responsible to check this numeric value against a list of all valid codes for the event and as each e-ticket is used, check the code off the list.

Invalid Ticket:

If the code on the ticket does not exist in the list, it means that this ticket is not valid for this event. It could be a ticket to another event or performance or may be generated fraudulently.

Duplicated Ticket:

If the code on the ticket exists in the list but is already checked off (marked as entered), it means that the ticket is duplicated fraudulently and access to the event should be denied.

Solutions:

My City Tickets offers different solutions to accurately and professionally validate the e-tickets and admit patrons to the event. Best solution for your event depends on the size of the event, number of gates, availability of the internet at the gate and your budget.


1.       An admission list printed by TicketorPrinting Admission List – Most simple solution for small events

o   Maximum size of the event: 150 person

o   Estimated cost: No cost

o   Maximum number of gates: 1

o   Internet Connection at the gate: not required

This is the most basic method that works for small events. You can use the “Delivery Reports” section of Ticketor to print the “Admission List” and take it to the venue. The gate keeper has to verify each e-ticket against the list and mark each admitted ticket to catch the duplicates.

The sale should end sometime before you print the admission list.


2.      A Bluetooth barcode scanner that is used along with a smartphone, tablet or computer to validate Ticketor generated e-ticketsUsing a Smartphone, Tablet or Laptop with an optional Bluetooth or USB Barcode Scanner (MOST POPULAR and recommended for almost any events)


o   Maximum size of the event: unlimited

o   Estimated cost: A smart phone or tablet (starting at $50) and optionally a Bluetooth (starting at $70) per gate

o   Maximum number of gates: Unlimited

o   Internet connection at the gate: Preferred – If not available, offline validation should be used

In this method you can use a smartphone, tablet or laptop (we will call it the "device" going forward) and an optional Bluetooth or USB barcode scanner

You will use either the device camera or an external barcode scanner to read the barcode or the QR code. Then the numeric code is transferred to the device for validation.

The device communicates with Ticketor's server through internet to validate the ticket against a central list and shows the validation result on the screen. This method ensures that all gate control devices validate against a single, central list and they are always in sync. Moreover, they have access to the most recent information which means you can keep selling tickets, adding new tickets, making returns even after you open the gates and the devices accommodate for all the updates. (for offline validation options, in case there is no internet access at the gate, continue reading)


Reading the code

  1. You can use an Android or IOS device with a high quality camera to read the barcodes or QR codes. Using a phone camera as the sole method of scanning is not recommended for large events since the camera may be slow in focusing and scanning tickets. The quality and speed varies depending on your camera and if the camera supports auto-focus. You probably will experience faster result by scanning QR codes rather than the barcodes. Scan a few tickets before the event to make sure your phone and camera gives you the speed you require.

Some notes:

  • Cameras can scan both from the paper tickets or buyer's phone display.

  • Cameras have better performance scanning QR codes then barcodes.

  • Most Barcode scanner devices, can scan both from the paper tickets and buyer's phone display. Check with the specification if yours can read from the display.

  • Barcode scanner devices, come in 1D (1 dimensional) or 2D (2 dimensional) variations. 2D scanners can scan both barcodes and QR codes while the 1D scanners can only read barcodes. You may get faster result with 2D scanners.

Instruction:

  1. Use the scanning app or web page

    1. If you are using the My City Tickets Gate app, launch the app. Otherwise launch the browser and go to your site and then "Control Panel > Events & Venues > Gate Control"

      The app and the gate control web page work similarly except that the web page cannot use the camera.

    2. Your browser may ask that "This website is trying to save data to your device". Make sure to allow the data to be saved. It will let you browse to load this page even when you are not connected to the internet.

    3. If you are not logged in, you will be asked to login as an administrator, event organizer, or gate controller. If you login as an administrator or gate controller, you will be able to perform gate control for all upcoming events but if you login as an organizer, you will only be able to access your own events.

    4. On the next page, select the event that you want to prepare for gate control.

    5. If you will have access to internet (Wi-Fi, 3G, 4G, etc.) at the gate select "Online" for validation type (recommended) otherwise select "Offline" and read more about offline gate validation below.

    6. Proceed to the Gate Control page. On website, click on "Download data" before proceeding to the gate control page.

    7. Scanning:

      • Enter the barcode manually: Tap the Barcode text box to activate it. Using your device keyboard, manually enter a valid or invalid numeric code and hit enter.

      • Use external barcode scanner: Tap the Barcode text box to activate it (the box should be selected for the borcode scanner to scan properly). Scan the barcode using the connected barcode scanner. The value should appear in the barcode box and validated immediately. You don't need to hit the enter key or touch the screen.

      • Using the camera: In the app, tap the camera icon. Then hold the QR code (preferred) or the barcode in front of the camera. Hold it for a couple second till the camera focuses and scans the barcode.

      As soon as the reading of the code is done, the value is send for validation and you should see the result as either a red or green box representing the validation result. If the ticket is invalid, you will see a pop up that you need to close before scanning the next ticket, otherwise you can keep scanning the next ticket without touching the screen.

      If the ticket is valid, it will show in a green box and your device will make a success beep, if not the result will show in a red box, the reason for the failure will pop up and your device will make a failure beep.

      Avoid touching the screen for continuous scanning. Keep scanning without touching the screen unless you get an invalid ticket.

      Find the best distance from either the camera or the barcode scanner to the ticket. If the ticket is too close or too far, it may not get scanned.

Other app features:

  1. Exit for re-entry: If somebody needs to leave the venue to come back again, you can switch to "Exit for re-entry" mode and scan their ticket. It will mark the ticket as "not entered" so they can use the ticket again when they come back.

  2. Search by name, email or confirmation number: If the patron does not have their tickets on them, you can look up and admit their tickets by name, email or confirmation number. Switch to the "Name/email" tab and enter a few letters of the buyer's name or email, then select the buyer from the auto-complete list and click on "Find Tickets". Or switch to "Confirmation Number" tab and search by their confirmation number. If the tickets are found, you may then want to verify the buyer's identity to make sure they are the actual buyer (owner) of the ticket. Then click on each ticket number to admit that ticket.

  3. Status: Click on the status button to get the latest status of tickets sold and admitted.

  4. Buyer detailed information: Click on any validation result box, to see more details about the ticket, buyer and purchase information.

Behind the scene / Fast primary result / Emergency network outage

As soon as you go to the gate validation page, the device communicates with the server and gets the latest version of valid codes and if they have entered or not. Anytime you scan a new ticket, the server sends the newest update to your device. So your device keeps a copy of the latest version of the admission list at all times.

Fast validation: Anytime a code is scanned, the device performs a primary validation using the copy of the data it has locally and instantly shows the primary validation result. The primary validation result is shown in light-green or light-red. Then the device contacts the server for the final validation result and changes the validation result to either green or red. On a regular network, it happens so fast that you will not see the primary validation result. But if the network is slow, you can pretty accurately rely on the primary result.

Emergency network outage: If the network goes down, and you need to keep scanning, you can scan using the data that is locally available in your device. The list can accurately verify the ticket validity and can detect duplicates to some extent.


Offline validation:

If you don't have access to reliable internet at the gate, you can still use the gate control system with some limitation.

In the gate control app (preferred) or website, after you select the event, select "Offline" as the validation method.

Select the "Number of gates". All devices should have the same value.

Then select the gate number that each device scans. For example, if you have 3 gates, one device should be assigned to gate #1, one device to gate #2 and one to gate #3. Label each device with the gate number.

If you have more than 1 gate, since the devices cannot communicate through the network and so there is no central list to be used, each gate should only admit a subset (a range) of tickets so that duplicates can be identified. To achieve that, each subset of patrons MUST enter from a specific gate. On the e-tickets and beneath the barcode there is a value starting with "G". This value ranges from "G1" to "G10". As you select the gate number, the system will tell you which G values are being admitted by this gate/device. You should make signs that explain which gate each person should use to enter based on the "G" value on their ticket. So gate 1 may only admit G1,G2, and G3 and other gates admit the rest.

Click on "Download data" button to download the list of valid barcodes to your device.

Notes:

  • Make sure to download/refresh data after all modification (add, update, delete) to the tickets are done. If you happen to need to add/delete tickets after you downloaded, you need to come back to this page and refresh the data. Selling tickets is OK and you can continue the sale after you download the date.
  • If you are using offline method, do not reload data after you start scanning tickets. The entries information will be overwritten and so the duplicate tickets may not be caught.
  • If you are using offline method, Returns and Refunds should be disabled after you download the data.

Best practice at the gate:

For medium and big events, where you expect a lot of audience to show up at the same time, speed is very important. One person with bad or forgotten tickets or the tickets that do not scan or validate, may hold the line for several minutes. It is nice if you can have somebody with a bigger tablet who can handle the special cases. If the gate controller cannot scan the tickets, they can simply move the person to that special line and keep the line going.

Scanning with one hand: 

The recommended Bluetooth scanners are designed in a way to easily get attached to the phone. You can use a double tape such as Scotch® Reusable Tapes to attach them to the back of your phone.

For other scanners, you can hold the scanner in one hand and keep the smartphone on a shelf, in your pocket or hanged on your chest. You will hear the audible beep and if you hear an invalid beep, you will need to take a look at the screen.  In this scenario, we recommend using a headphone in case the environment is too noisy.


Compatible Barcode Scanners:

Any Barcode scanner that can connect to your device (through USB or Bluetooth) and can work in HID mode and can scan CODE-128 barcodes and optionally QR codes can be used with Ticketor.

HID (human input device) mode, means that the Barcode scanner can work as a keyboard and enter the barcode in any text field.

The best practice is to use a Smartphone as the device. In that case, make sure the Bluetooth barcode scanner is compatible with your device. They should specifically mention that they are compatible with IOS or Android.

2D (2 dimensional) scanners that are capable of scanning QR codes, give you the flexibility to scan either the Barcode or the QR code and may scan faster.


3123

How to create recurring events, classes or booking system with time-slots, using My City Tickets

9/13/2022 Admin


How to create recurring events, classes or booking system with time-slots, using My City Tickets

Recurring events with time-slots, which may recur several times a day, are very common type of events and are vastly used for any event, class, booking, renting or registration that is time-based.

Some common use-cases are:

  • Admission to a museum, amusement park, or a show
  • Reserving time for an attraction or activity
  • Registration for a class or training such as sport, yoga, arts, dance, music, etc
  • Holiday shows
  • Movie theaters and cinemas
  • Transportation (buses, ferries, …)
  • Tour reservation
  • Drive through events and shows like holiday lightshows
  • Reserving time to use a room or equipment like booking a conference room, a VR experience or a Jet ski
  • ...

However, most ticketing systems miss this functionality and the event organizers usually end up using work-arounds that are often not optimal or confusing. Some common issues when using such work-arounds to create timed-events are:

  • Event showing the wrong date or time during the purchase or on the ticket which causes confusion to the buyer
  • Hard to manage all instances of the event or individual instances
  • Hard to pull reports or perform ticket validation
  • Hard or impossible for the buyer to change their date or time without contacting the box-office staff

My City Tickets, however, has full support for recurring time-based events, classes, booking or registration with or without multiple time-slots per day.


What is My City Tickets?

My City Tickets, is a white-label, fully branded box-office and ticketing / booking system that allows you to have your own full-featured registration and ticketing system with full control over everything including buyer fees, pricing, returns, terms and policies.

You can use it for online sales, ticket booth or retail location, as well as over-the-phone sales.

Ticketor can be used for any type of event or activity that requires ticketing, admission, registration or booking such as:

  • Events
  • Classes
  • Admission to a museum, amusement park or attraction
  • Tour reservation
  • Transportation
  • Booking a service, room or equipment
  • ...

My City Tickets comes at very reasonable and unbeatable price that is transferable to the buyer, and it comes with great customer support, documentation, walk-through and tutorial videos.

My City Tickets is known to be the most feature-full, flexible and automated registration and ticketing system that meets the requirements for any ticketing or registration scenario.

It also allows you to collect the sales money directly using your own payment processor or PayPal account so that you receive the sales money directly and as tickets sell.

Your My City Tickets website is fully mobile friendly and search engine optimized. Your website and events are submitted to Google and other search engines to make sure you get the highest visibility on the web.

You can read more about the My City Tickets features at www.mycitytickets.com


Sign up for My City Tickets


If you already have a My City Tickets account, then sign in to your account by browsing to your My City Tickets link. Otherwise Sign up on Mycitytickets.com. It takes less than a minute and requires no credit card.

Fill out your basic information on the sign up form, choose an address for your My City Tickets portal and click on the button.

Choose any plan at this point as all the plans support all the ticketing features you may need. Moreover you can always change your plan at a later time.

Click on the sign up button to see the confirmation page.

Your ticketing and reservation system is ready and you can navigate there using the link on the confirmation page to configure it, customize it and create your events, store, gift cards, etc.

When you first land on your website, or a new page of your website, a walk-through pops up. Go through the steps to learn about your My City Tickets site or the page you are on. It takes just a couple minutes and it is the fastest way to make yourself familiar with the site or that feature. It will save you lots of time down the road.


Create an event


Creating an event on My City Tickets is quick and easy. Let’s quickly create an event.

Please note that although we use the term “event” in this, the concept can equally apply to any activity that may require ticketing, admission, booking or reservation.

I can create the event from the quick links section, or from the “Control Panel”, “Events” button.

It pops up an “Event creation wizard” that I can use to create my events basics before going to the actual event editor that offers plenty of options and customizations.

Alternatively, I can close the pop up and use the event editor.

  • Set the event title.
  • Select the event type.

    The event can be “Online” or “In-person” . Online events can be “Live” or “On-demand”. You can use on-demand events to easily monetize your videos.

    In-person events can be “assigned seated” or “General admission” or a combination of both. “Assigned seated” events allow the buyers to pick their seat on an interactive seating chart. My City Tickets offers a state-of-the-art seating chart designer tool that allows you to build any seating chart including, theater style, round-table dinner style, restaurant or cabaret style, night-club style or any combination of them quickly and easily at no charge.

  • Select or create a venue. Venue is the physical or virtual place where your event happens. For seated events, the venue also contains the seating chart.
  • Select the date and time of the event. If the event is recurring, you can set the date and time to the first recurrence and later-on set the schedule.
  • Optionally upload an image or flyer for the event
  • Set the tax or vat and social distancing setting
  • Set the prices and pricing structure.

    My City Tickets price levels and variations, gives you full flexibility to create all kind of pricing. If the event is assigned seated, it also lets you set multiple prices per seat such as kids price vs adult price.

    You can add as many “price levels” and each “price level” can have as many “price variations”.

    Some example of price levels and variations are:

    • General Price
    • VIP
    • Kids
    • Seniors
    • Members
    • Time-based pricing such as
      • Early-bird
      • Last-minute
    • Group based pricing such as
      • Couples ticket
      • Family ticket
      • Group of 10 or more
      • 2-day ticket
      • Weekend pass
      • Multi-session or multi-day tickets

    Price levels and variations can have their own face price as well as the fee or the service charge that the buyer pays to you as you are the one who sets and collects the service charges and you can charge as high or as low as you like.

    They can also be “Password protected” and hidden from general public.

    Note that, you can change the pricing and the capacity at any time and the changes will be effective immediately.

  • Add a payment processor or my PayPal

    Payment processor is a financial service that allows you to charge credit and debit cards and deposits the money in your bank account. Most payment processors, except for PayPal, are behind the scene and the user doesn’t know about their name or brand.

    We support most common payment processors including Stripe, Square, PayPal, Braintree, Authorize.net, …. If you don’t have one, you can simply get a Stripe or PayPal account in a couple minutes and use it right-away.

    Click on Stripe or PayPal button, sign in to your account or fill out the sign up form to get a new account, and click on the button to add that to your account.

  • Finish the event creation wizard and it will take you to advanced event configuration.

    There are lots of settings and configurations that allows you to customize the event.

    Complete the event by adding the event description, fine-tune the settings, add your flyer and video.

    You can also:

    • Set the event’s sales start and end date and time
    • Specify what delivery methods are available for the event
    • Set your return or exchange/upgrade policy so buyers can upgrade their tickets or change the date without contacting you
    • Set the event categories, type and genre
    • Set the event availability, restrictions or make it available to certain group or protect it with individual passwords
    • Add questions for the buyer to answer
    • Add related events, merchandise, gift cards or donations to the pre-checkout page to up-sell and promote them
  • And finally test the event as an event buyer by going to the “purchase ticket” page and make sure everything works as expected.

Make the event recurring and set the schedule and time-slots

Ticketor recurring event scheduler

On the main tab, click to make the evet recurring. It opens the flexible scheduler that allows you to schedule the event as you wish.

You can click on “Add recurrence” and add as many recurrences.

You can add recurrences such as:

  • Single recurrence (at a specific date and time)
  • Daily recurrence
  • Weekly recurrence
  • Monthly by day of month such as 5th and 10th of the month
  • Monthly by day of the week such as 2nd Monday of every month

If you have multiple time-slots per day, you should add one recurrence per time-slot

You can also exclude some days or time slots to accommodate for holidays. Just click on “Add exception” and add your exceptions.

Note that you can always come back and add more recurrences, extend the date-range or exclude some dates but you better exclude the dates before tickets are sold for that date.

Note: If you are a new customer, you may need a one-time review and approval to make the event recurring. The process is in place to make sure you have created your event correctly before creating tens or hundreds of instances of the event. Approval is done very quickly and you can always chat with the support to expedite the approval.

Feel free to chat with your dedicated support engineer and ask them to review your event. Ask questions, as many as you have. Make sure your event and process are all set correctly before going live.


Your Event IS LIVE and ready to sell!


Your event is all set, live and ready to sell.

Before promoting the event, from the “Actions” menu, go to the “Buy tickets page” and experience the site as a buyer. The link will take you to a page with the event information, address, description, flyer and a calendar.

Pick a date/time-slot and you will see the available tickets for that date.

Add tickets to your cart.

You can add tickets to as many events or dates. You can even add merchandise, gift cards, donation, or services to your cart and check them out all in one transaction.

When you are comfortable that the event is ready, go to promote tab of the event creation page, get the link to your home page (where all your events are listed) or the direct link to the event and share it on social media, newsletter or other ads. Add the link to your website or embed the ticketing into your website or WordPress.

for more information and detailed instruction, check out Create recurring events and event replication instruction.


POS (Point of sales) - Sell tickets in-person or over the phone

POS (Point of sales) - Sell tickets in-person or over the phone

Make yourself familiar with the POS page that is available from “Control Panel > Box Office > POS”

The Point Of Sale, is a touch-friendly, very fast, single page application that allows you and your sales staff to sell tickets or reservations face-to-face or over the phone, in as many ticket booths or retail locations.

You can accept credit card, cash, check or you can send invoices. You can apply promotion code, season tickets or gift cards. Based on your permission level, you can add additional fees or give ad-hoc or direct discount. This feature allows you to easily give away complimentary or discounted tickets.

You can use the POS on any tablet, computer or mobile device.

In terms of equipment for your retail location, My City Tickets POS is very flexible. You can use no equipment at all, or use regular office printers or professional thermal ticket or receipt printers and credit card readers.

The POS allows you to sell anonymously or you can look up or create registered users. If an email address is provided during the sale, the buyer receives the tickets on their phone which eliminates the need for a printer and paper tickets.


Gate Control & Admission - Barcode Scanning

Gate Control & Admission - Barcode Scanning

You can use your phone or any device with a browser and camera to scan the tickets. Make yourself familiar with the gate control app. You can use the Android or IOS app or you can use the browser app that is available from the Control Panel. You can admit buyers by scanning the barcode or the QR-code on their ticket or look them up by name, email, phone number or confirmation number.

Gate control also supports ‘Exit and Re-entry’ so you don’t need to stamp attendees.